

21R2.1 Functionality Guide
The Functionality Guide is intended for Sales Operations, Business Administrators, System Integrators, and others responsible for making decisions about what features are needed for end users to be successful and deciding which features work together with existing customer configurations.
Information includes an overview of each feature, examples, screen shots, and targeted information on how to use each feature. Select the heading link to display the topic which includes configuration instructions, if applicable.
General
Attaching Salesforce Files on Mobile Devices
For Lightning-enabled users on mobile devices, files are automatically uploaded as Salesforce Files if they are attached to records via Attachments related lists or embedded (zvod) attachment fields.
For Lightning-enabled users on mobile devices, files are automatically uploaded as Salesforce Files if they are attached to records via Attachments related lists or embedded (zvod) attachment fields for any object, including custom objects. To allow users to attach Files to records on mobile devices for custom objects, ensure each custom object has a unique Mobile ID field. See Administrative Do's and Don'ts for more information.
On the iPad platform, expense receipts attached to call reports are uploaded as Salesforce Files. Additionally, Veeva CRM does not support uploading attachments from cloud storage apps, including when users go online in the embedded browser.
Managing Salesforce Files on Mobile Devices
For Lightning-enabled users who can upload attachments as Salesforce Files, the Upload Files button displays in place of the Add Attachment button on Attachments related lists and for embedded attachment fields.
Users can upload files up to 35 MB. If users try to upload larger files, an error message displays.
After attaching a file as a Salesforce File, users can perform the following actions from the More Actions menu, depending on the sharing settings of the File:
- Edit – Edit the description of the file
- Delete – Permanently delete the file from CRM
- Remove from Record – Detach the file from the record, but the file can still be viewed from the Files tab online
For a user to have access to the Remove from Record action, one of the following must be true: The user is the owner of the FileThe user has Collaborator access to the FileThe access permission for the File is Set by Record and the user has CRU access to the object to which the File is linked
Account Management
Account Plan Deep Cloning
Account Plan Deep Cloning allows Key Account Managers (KAMs) to clone account plans for reuse. The team working on the account plan continually measures the success of the plan, and, based on success rates, can reuse account plans for other Key Accounts to achieve similar results.
Customers can also create account plans to act as templates they manage. KAMs can clone those templates to start a new account plan. Also, if customers create new account plans every year for their accounts, a KAM can clone a previous year’s account plan to use as the basis for the new plan.
For example, Sarah Jones, a KAM, wrote an account plan for Newton Memorial Hospital. The account plan goal is to convert Newton Memorial to Cholecap over other arthritis products. Because the account plan was successful, Sarah clones the account plan to use the same account plan for Chilton Memorial Hospital.
Considerations for Account Plan Deep Cloning
- The Medical_Insight_vod and Call2_vod objects are not available for cloning as part of an Account Plan Deep Clone and do not display on the Clone Account Plan screen
- If a user attempts to open an account plan without the appropriate permissions, an invalid permissions error message displays
- Records are cloned as is, with the following exceptions:
- If the out-of-the-box Account Plan hierarchy objects are in use, the Progress_vod field values are reset, and the Status is set to Pending_vod. Additionally, all fields on the hierarchy object representing counts of child objects, for example, Total_Account_Tactics_vod__c, are reset, and the Completed_Flag_vod check box on the Call_Objective_vod object are deselected.
- The Owner_vod field on all cloned records is set to the user who initiates the clone
- Any fields the user does not have FLS access to are not copied over in the clone
Using Account Plan Deep Cloning
The Clone Account Plan screen can be launched by selecting the Clone Account Plan button on any account plan.
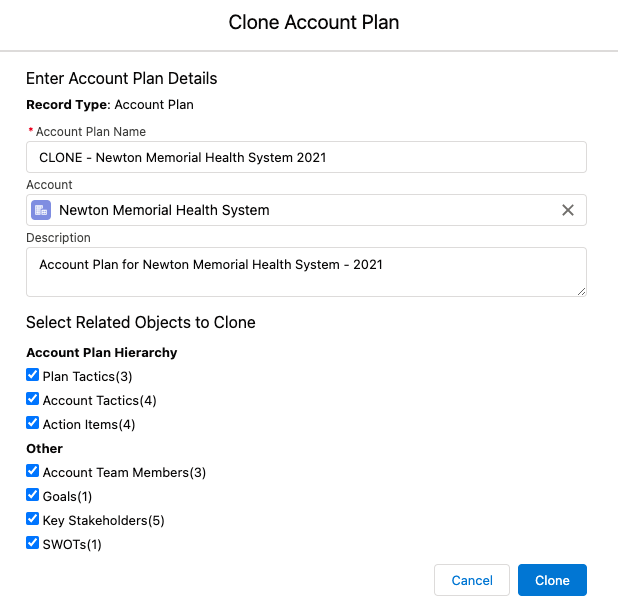
The items in the Account Plan Hierarchy section display based on what is configured. Account Plan Deep Cloning works with out-of-the-box and customized Account Plan Hierarchies, including customized Account Plan Hierarchies that include custom objects. Additionally, Account Plan Deep Cloning supports cloning records from related custom objects that have a lookup to the Account Plan object.
When an account plan is cloned, the account plan, records from the selected hierarchy, and records from related objects are cloned. The Clones_vod field on the Account_Plan_vod object is populated on the newly created account plan to reference the account plan that was cloned.
Records are cloned as is, with the following exceptions:
- If the out-of-the-box Account Plan hierarchy objects are in use, the Progress_vod field values are reset, and the Status is set to Pending_vod. Additionally, all fields on the hierarchy object representing counts of child objects, for example, Total_Account_Tactics_vod__c, are reset, and the Completed_Flag_vod check box on the Call_Objective_vod object are deselected.
- The Suggestion_vod and Suggestion_Reason_vod fields are not reset on Call Objective records being cloned
- Child call objectives of recurring call objectives are not copied as part of the clone process.
- If a call objective has a prerequisite that is also cloned, the new call objective updates the prerequisite to be the newly-created prerequisite call objective
- The Owner_vod field on all cloned records is set to the user who initiates the clone
- Any fields the user does not have FLS access to are not copied over in the clone
Approved Notes
Using Monitored Text to Review Approved Notes Violations
Monitored Text enables compliance users to use native Salesforce functionality, for example, list views, column sorting, and filtering, quickly locate, view, and resolve the Approved Notes violations they are responsible for. Additionally, if the same user-input text contains multiple violations, all violations are grouped together as Monitored Text records, streamlining the review process while still maintaining compliance.
For example, Larry Lakes is a compliance user in the US responsible for reviewing Kickback violations. Larry selects a custom list view that only displays violations in the US with a Category of Kickback, a Status of Open, and an Assignee of himself. This lets him quickly identify which violations to review.
Considerations
- This feature will completely replace Reviewer Central in a future release. If Approved Notes was enabled prior to the 21R2.0 release, admins should disable Reviewer Central by removing integration and compliance users’ access to the VeevaReviewerCentral Visualforce page.
- The Approved Notes Process creates Monitored_Text_vod records that compliance users review and resolve
- It is recommended that orgs using Approved Notes to monitor Approved Emails enable Previewing Rendered Approved Email Content to enable easier reviewing of text sent in an email
- Monitored_Text_vod records are not automatically assigned to users. It is recommended customers configure an assignment process to suit their business needs.
Prerequisites
Using the Flagged Phrases List View
To review violations with Monitored Text, navigate to the Flagged Phrases list view of the Monitored Text tab. This list view displays the following columns:
- Monitored Text – Navigates to the corresponding Monitored_Text_vod record for review. See Submitting Feedback on Monitored Text for more information.
- Text Last Modified Date – The day and time when the text containing the violation was last modified
- Status
- Flagged Phrase – The violation in the text
- Text – The text entered by the user containing the violation
- Monitoring Rule Name
- Category – See Creating Monitoring Rules for the list of potential categories
- Monitored Object – The object containing the violation, or example, Call2_vod
- Monitored Field – The field containing the violation, for example, Call_Notes__c
- Assignee
- Country – This field populates regardless of if the Creating Country-Specific Approved Notes Rules feature is enabled
- Last Modified By

Submitting Feedback on Monitored Text
When a compliance user selects a Monitored_Text_vod record from the Flagged Phrases list view, the corresponding Monitored_Text_vod record displays.
The information on this record depends on the record type of the Monitored_Text_vod record, which can be one of the following values:
- Flagged Phrase
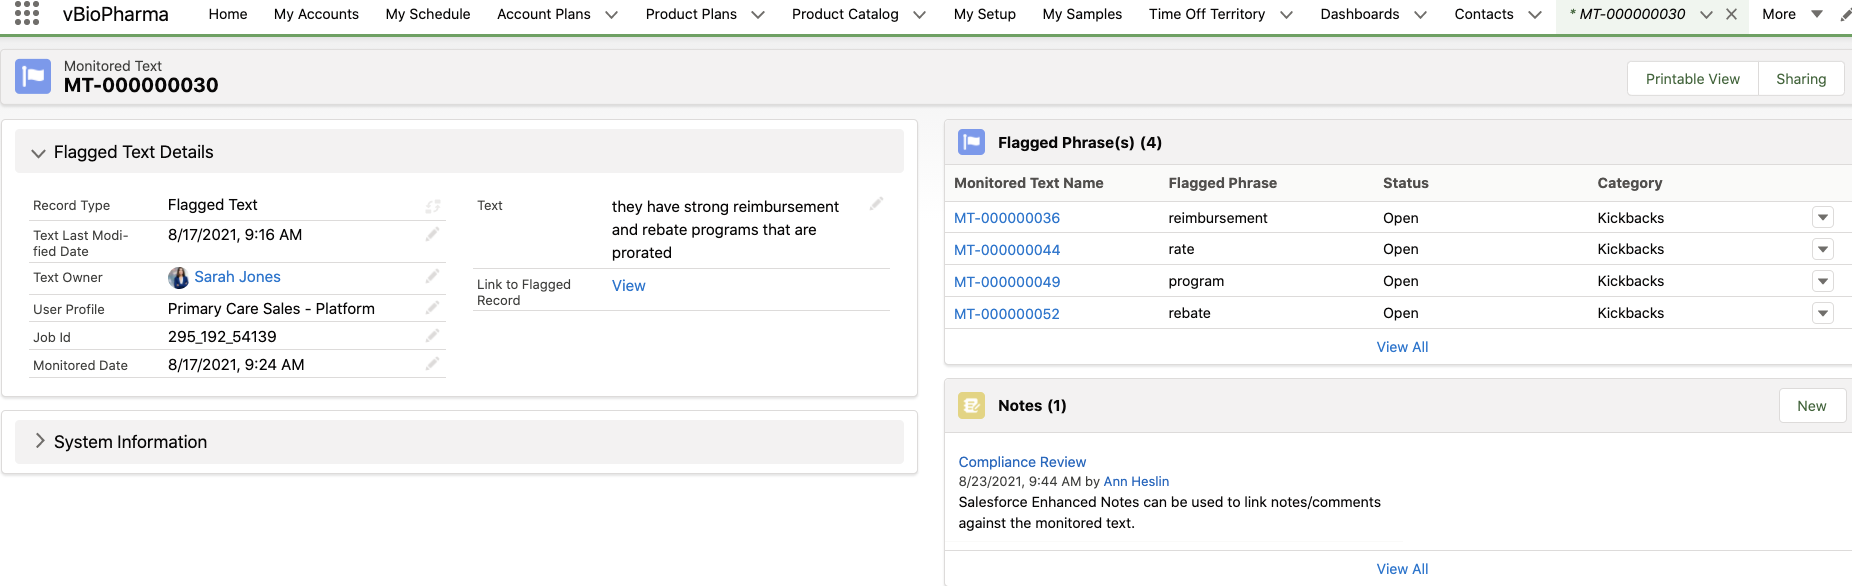
- Flagged Text – Every Flagged Phrase has a parent Flagged text record. If one user-input field contains violations against multiple phrases, the Flagged Text record serves as a parent for all related Flagged Phrases.
Submitting Feedback on a Flagged Phrase
Flagged Phrase-type Monitored_Text_vod records display the following panels with the following information:
-
Flagged Phrase Details
- Parent Monitored Text – Links to the corresponding Flagged Text-type Monitored_Text_vod record
- Flagged Phrase – The phrase that caused the violation
- Text – The complete text containing the violation
- Link to Flagged Record – Links to the record containing the violation
-
Monitoring Details
- Text Last Modified Date
- Text Last Modified By – Links to the user who last modified the text containing the violation
- User Profile – The profile of the user who last modified the text containing the violation
- Job ID – The ID of the Approved Notes Process that created this record
- Monitored Date – The date the violation was flagged
- Monitoring Rule Name – Links to the appropriate Monitoring_Rule_vod object
- Mentioned Object – The object containing the violation, for example, Call2_vod
- Mentioned Field – The field containing the violation, for example, Call_Notes__c
- Category – See Creating Monitoring Rules for the list of potential categories
- Country – This field populates regardless of if the Creating Country-Specific Approved Notes Rules feature is enabled
- Feedback
- Status – Editing this field enables compliance users to resolve a violation or flag it for further review
- Assignee
- Is this Flagged Phrase a Violation? – Edit this field to provide feedback on if the text was correctly matched by the monitoring rule
- Notes – Allows users to leave comments about the record
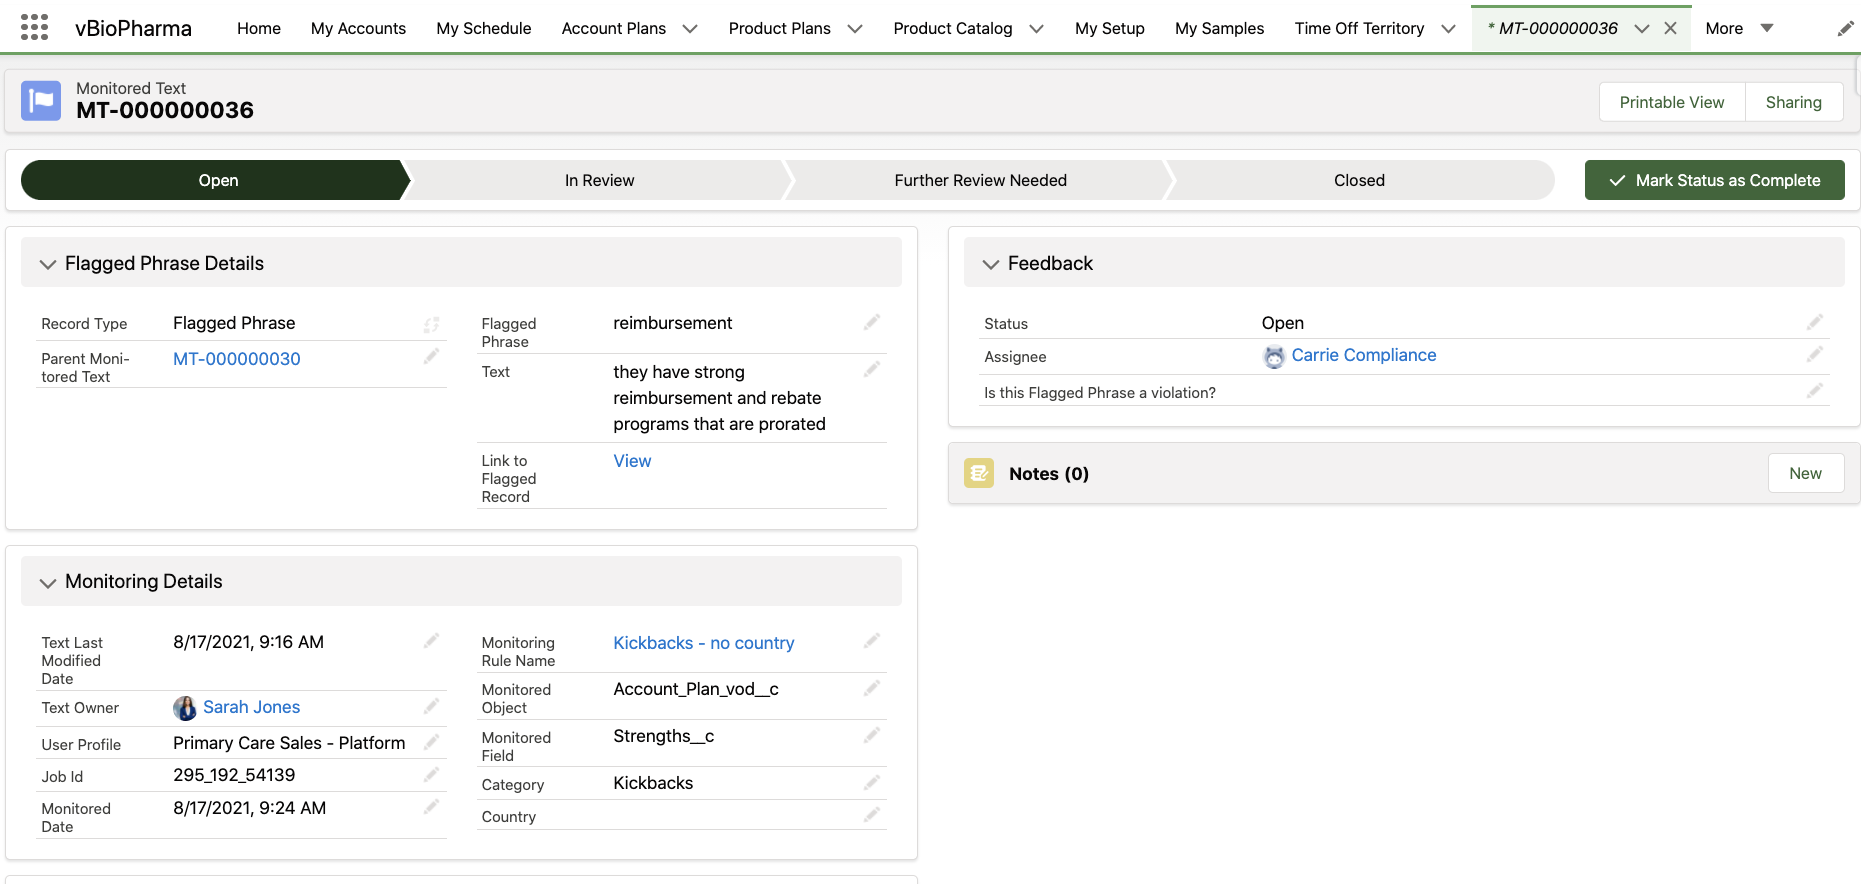
In addition to editing the Status field, compliance users can review and update the status of a Flagged Phrase using the status bar at the top of the page, along with the Mark Status as Complete button.
The status bar and Mark Status as Complete button are only available in Lightning-enabled orgs.
Submitting Feedback on Flagged Text
Flagged Text-type Monitored_Text_vod records display the following panels with the following information:
- Flagged Text Details
- Text Last Modified Date
- Text Last Modified By – Links to the user who last modified the text containing the violation
- User Profile – The profile of the user who last modified the text containing the violation
- Job ID – The ID of the Approved Notes Process that created this record
- Monitored Date – The date the violation was flagged
- Text – The complete text containing the violations of the child Flagged Phrases
- Link to Flagged Record
- Flagged Phrases – The related list of all associated Flagged Phrase-type Monitored_Text_vod records
- Monitored Text Name – Links to the corresponding Flagged Phrase-type Monitored_Text_vod record
- Flagged Phrase
- Status
- Category – See Creating Monitoring Rules for the list of potential categories
- Notes – Allows users to leave comments about the record
Engage Meeting
Host Screen Sharing on the iPad
Hosts can share a variety of content in addition to CLM presentations in an Engage meeting. This enables greater interactivity during Engage meetings as hosts can share their entire screen, including assets or applications outside of CRM.
This feature is only available when CRM is installed via the app store. Customers using a manual installation must migrate to the app store version to use this feature.
For example, Sarah Jones hosts an Engage meeting with several attendees. Sarah wants to share materials that are relevant to the meeting, but are not stored in CLM content. She starts sharing her screen and navigates to the appropriate materials outside of CLM. Her attendees can see these materials in the meeting until Sarah stops sharing her screen.
Considerations
- This feature displays everything on the host’s device to attendees, including iOS notifications, the Meeting Controls Menu, other parts of CRM, and other applications. Pills notifying the host when they start and stop sharing do not display to attendees.
- This feature replaces the default sharing experience when enabled
- The splash screen does not display when the meeting starts. Instead, full-screen video tiles display until the host or an attendee starts sharing their screen.
- Share status borders do not display
- Users can share locally stored PowerPoint presentations via the Displaying PowerPoint Presentations in CLM feature.
- Screen recordings may not save correctly if users begin recording their screen before sharing their screen
- User attendees on the iPad cannot share their screen even with this feature enabled
- Controlling screen share is only supported through the Meeting Controls Menu
Sharing the Screen
To start sharing the screen to attendees:
- Navigate to the Meeting Controls Menu.
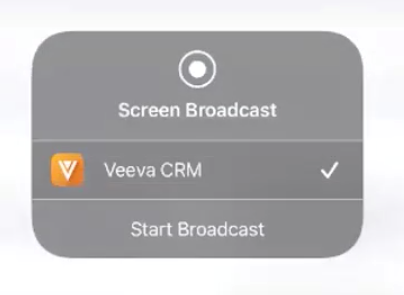
- Select Start Share to display the iOS Broadcasting modal.
-
Select Veeva CRM.
-
Select Start Broadcast.
When the hosts selects this button, a countdown notifies hosts when content will start displaying to attendees. During this countdown, hosts can select anywhere outside of the modal to dismiss it to prepare for when the countdown finishes. The modal is automatically dismissed once the countdown finishes.
Once the host starts sharing their screen to attendees, everything that displays on the host’s device, including iOS notifications, the Meeting Controls Menu, other parts of CRM, and other applications, displays to attendees.
While audio and video can be played through the host's device, this functionality is not supported by Apple. Content creators should thoroughly test audio and video content before displaying content to attendees.
Ending Screen Sharing
Hosts can stop sharing their screen via one of the following methods:
- Select the Stop Share button in the Meeting Controls Menu
- Ending or exiting the meeting
Events Management
Virtual Event Host Screen Sharing
Hosts can share a variety of content in addition to CLM presentations in a virtual event. This enables greater interactivity during virtual events as hosts can share their entire screen, including assets or applications outside of CRM.
This feature is only available when CRM is installed via the app store. Customers using a manual installation must migrate to the app store version to use this feature.
For example, Sarah Jones hosts a virtual event with several attendees. Sarah wants to share materials that are relevant to the event, but are not stored in CRM. She starts sharing her screen and navigates to the materials outside of CRM. Her attendees can see these materials in the event until Sarah stops sharing her screen.
This feature does not require configuration.
Considerations
- This feature displays everything on the host’s device to attendees, including iOS notifications, the Meeting Controls Menu, other parts of CRM, and other applications
- While audio and video can be played through the host's device, this functionality is not supported by Apple. Content creators should thoroughly test audio and video content before displaying content to attendees.
- Alternative Hosts can also share their screen
Sharing the Screen
To start sharing the screen to attendees:
-
Select Share Content.
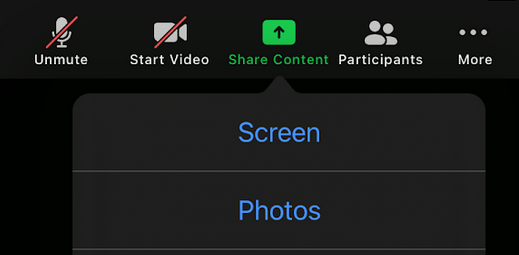
-
Select Screen to display the iOS Broadcasting modal.
If an attendee is sharing their screen when the host or alternative host selects Share Screen, a confirmation modal displays requiring hosts to confirm they wish to override the screen share.
-
Select Veeva CRM.
-
Select Start Broadcast.
When the hosts selects this button, a countdown notifies hosts when content will start displaying to attendees. During this countdown, hosts can select anywhere outside of the modal to dismiss it to prepare for when the countdown finishes. The modal is automatically dismissed once the countdown finishes.
Once the host starts sharing their screen to attendees, everything that displays on the host’s device, including iOS notifications, other parts of CRM, and other applications, display to attendees.
Hosts can minimize the meeting UI to navigate to other parts of the CRM application by selecting Minimize Meeting in the More menu.
Ending Screen Sharing
Hosts can stop sharing their screen via one of the following methods:
- Select the Stop Share button in the Meeting Controls Menu
- Ending or exiting the virtual event
Enhanced Event Material Availability
To improve accuracy and increase compliance when organizing events, users have the latest content available when selecting event materials. This includes newly created or recently updated records that may not display as available by default.
For example, Sarah Jones organizes an event and sends an Approved Email invitation to attendees. When she views the list of Approved Email Templates to select for her event, her list of templates is automatically compared to the list on her org. Any missing or out of date templates are created on Sarah’s device before the list displays to her.
This feature does not require configuration.
Considerations
- The following content types are supported by this feature:
- Approved Email Templates
- Print Invitation Templates
- Print Sign In Templates
- Speaker Contract Templates
- The following content types are not supported by this feature:
- Vault Linked Materials
- Custom record types
- New EM_Event_Material_vod records are created to ensure the most up to date content is available
Selecting Event Materials
When users view a list of any of the supported content types, the list available to the user is compared to the same list in the org. Any missing or out of date materials are created or updated before the list displays to the user.
Event Material records are not updated for existing events if existing content is not changed. Existing EM_Event_Material_vod records are updated when one of the following is true:
- New content is available
- One of the following fields are updated:
- Topic_vod
- Country_vod
- EM_Event_Configuration_vod
The Last Modified timestamp indicates when an event material was updated.
MyInsights Studio
This feature is available on September 2, 2021.
Users can preview display elements in MyInsights Studio to confirm the content displays as expected without having to deploy the content.
